29.3.09

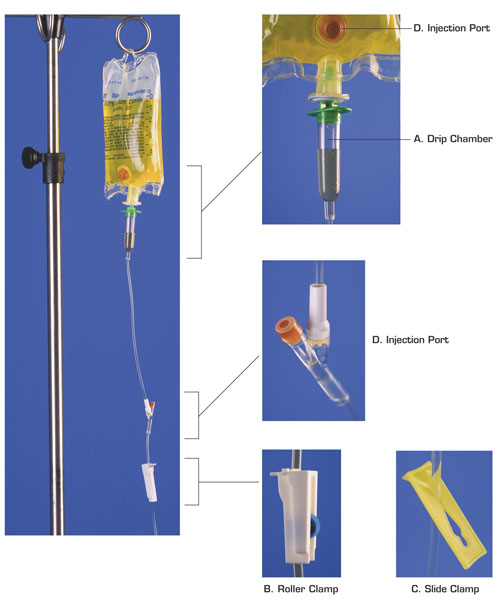
Administering Medications by IV Piggyback to an Existing IV


Medical Equipments:
  • Medication administration record (MAR)
  • Prepared and labeled medication 50 ml solution bag from pharmacy
  • Alcohol swab
  • Secondary administration set
  • Needle-less locking cannula

Nursing Procedures:
  1. Gather all of prepared equipments
  2. Wash your hand
  3. Check patient identification or arm-band
  4. Explain the procedures to the patient
  5. Observe the puncture site for redness and puffiness then palpate for tenderness
  6. Observe fluid infusing and check the patency of infusion site
  7. Remove IV container from the pole and lower the container below the level of infusion site
  8. Observe for backflow of blood into the hub of the venous access device and replace container on IV hole
  9. Secure the medication bag and check the prescription and the MAR
  10. Check patient's chart for allergies and drug compability
  11. Hang the secondary bag on IV hole
  12. Add the administration set to the secondary bag and prime the tubing
  13. Affix a needle-less locking cannula to the end of tubing
  14. Cleanse needle-less Y-site injection port of primary IV tubing closest to infusion site with an alcohol swab and allow to dry
  15. Insert needle-less locking cannula of secondary bag set into Y-site injection port of primary set ans secure in place with tape
  16. Affix the extension hook to the primary bag on the IV pole so that the primary bag hangs below the level of the secondary bag
  17. Open clamp of secondary tubing and adjust drip rate to desired infusion rate
  18. Observe patient for any signs or adverse reaction to the medication
  19. When secondary bag and drip chamber are empty, close the clamp on secondary system, readjust drip of primary solution as indicated and remove the secondary system
  20. Record medication infusion on the MAR and note any patient's responses

Administering an Intramuscular Injection

Medical Equipments:
  • Medication administration report (MAR)
  • Sterile 3-ml syringe and long bevel 33 to 22 gauge
  • Medication as prescribed
  • Alcohol swab
  • Non-sterile gloves
  • Sterile 2 x 2 gauze pad
Nursing Procedures:
  1. Identify the patient's allergies to any known medication
  2. Wash your hands
  3. Follow the rule of five rights
  4. Obtain the medication from an ampule or vial
  5. Check the patient identification or arm band
  6. Position patient in an appropriate position to expose the site of injection
  7. For deltoid area: sitting position
  8. For ventrogluteal area: side-lying, flex the knee, pivot the leg forward the hip about 20 degrees so it can rest on the bed; supine position, flex the knee on injection site; or prone position, point toes inward toward each other to internally rotate the femur
  9. Don non-sterile gloves
  10. Assess the skin for redness, scarring, breaks and palpate for lumps or nodules
  11. Select using the anatomic landmarks
  12. The area for injection is cleansed by an alcohol swab from inside outward using friction and wait 30 seconds to allow to dry
  13. Remove the needle cap by pulling it straight off and expel any air bubbles from the syringe
  14. Pull the skin down or to one side (Z-track technique) with non-dominant hand
  15. Administer in deltoid: quickly insert the needle with a cart-like motion at 90 degrees angle
  16. Administer in ventrogluteal: quickly insert the needle using a dart-like motion and steady pressure at 90 degrees angle to the iliac crest in the middle of the V
  17. Aspirate it by pulling back the plunger and observe for blood
  18. If blood is appeared, remove the needle and discard
  19. If blood is not appeared, inject the medication slowly about 10 sec per ml
  20. Wait 10 seconds after the medication has been injected, then smoothly withdraw the needle at the same angle of insertion
  21. Gently pressure is applied at the site with a dry sterile 2 x 2 gauze and do not massage the injection site. Swab using gentle pressure
  22. Discard the syringe and needle in sharps box container and never recap the needle
  23. Place the patient in comfort position and encourage him/her to perform leg exercises (flexion and extension) after receiving ventrogluteal injection
  24. Remove gloves and wash your hands
  25. Record on the medication administration report the dosage, route, site and time or injection
  26. Observe the injection site within 2-4 hours and evaluate the patient's responses

24.3.09

Administering an Subcutaneous Injection

Medical Equipments:
  • Medication administration record (MAR)
  • Sterile syringe and 5/8 inch needle
  • Disposable gloves
  • Two alcohol swabs
  • Medication as prescribed
Nursing Procedures:
  1. Identify patient's allergies to any known medication
  2. Wash your hands
  3. Follow the five rights of drug administrations
  4. Prepare medication from an ampule or vial and place them on a clean surface in the patient's room
  5. Check the patient's identification card or armband
  6. Inform patient about the procedure
  7. Place patient in a comfortable position and provide for privacy
  8. Don non-sterile gloves
  9. Assess and observe the skins for bruises, redness, hard tissue, or broken skin
  10. Cleanse the site for injection with an alcohol swab from inside to outside
  11. Prepare the injection by removing the needle guard and expressing any air bubbles from the syringes, and check the dosage in the syringes
  12. With dominant hand, hold the syringe between thumb and forefinger
  13. With non-dominant hand, pinch the subcutaneous tissue between the thumb and forefinger, or spread the tissue taut if the patient has substantial subcutaneous tissue
  14. Insert the needle quickly at 45 or 90 degrees angle


  15. Release the subcutaneous tissue and grasp the barrel of the syringe with non-dominant hand
  16. With dominant dominant hand, aspirate by pulling back on the plunger gently, except when administering an anticoagulant injection
  17. If blood appears, remove needle and discard in a sharps box container
  18. Inject medication slowly if there is no blood present
  19. Remove the needle quickly and lightly massage area with alcohol swab, do not massage the injection site after an anticoagulant injection
  20. Do not recap needle, discard the needle in a sharps box container
  21. Place patient in comfort position
  22. Remove glove and wash hands
  23. Record the route, site, and time of injection on the medication administration record
  24. Observe any side or adverse effects and assess the effectiveness of the medication at the appropriate time

Administer Intradermal Injection

Medical Equipments:
  • Medication administration record (MAR)
  • Sterile tuberculin syringes and short bevel, 25-27 gauge, 3/8-1/2 inch needle
  • Drug / medication
  • Alcohol swab and sterile 2 x 2 gauze pad
  • Disposable glove

Nursing Procedures:
  1. Check the patient's allergies to any known medication
  2. Wash your hands
  3. Follow the five rights drug administrations
  4. Prepare the medication from an ampule or vial and take the medication to the client's room and put on a clean surface
  5. Check the patient's identification card or arm band
  6. Inform the patient about the procedure
  7. Position the patient as comfortable as possible and provide for privacy
  8. Wash hands and don non sterile gloves
  9. Assess the skin for bruises, redness, or broken tissue
  10. Select an appropriate site using appropriate anatomic landmarks
  11. Cleanse the site with an alcohol swab in a firm circular motion, cleanse from inside to outside, and allow alcohol to dry
  12. Obtain the syringe for injection
  13. Remove the needle guard
  14. Remove any air bubbles from the syringe
  15. Check the amount of solution in the syringe
  16. Hold the syringe in dominant hand
  17. With non dominant hand grasp the patient's dorsal forearm and gently pull the skin SEE PICTURE
  18. Place the needle close to the skin with bevel side up. Insert the needle at a 10-15 degrees angle until resistance is felt, and advance the needle approximately 3 mm below the skin surface. The needle's tip should be visible under the skin
  19. Push the medication slowly and observe the development of a bleb (large flaccid vesicle). If it does not appear, withdraw the needle slightly
  20. Withdraw the needle
  21. Gently part area with a dray 2x2 sterile gauze pad
  22. Avoid massage the area after removing the needle
  23. The needle and syringes are discharged in a sharps box container
  24. Remove glove and wash hand
  25. Observe for signs of allergic reaction
  26. Draw a circle around the perimeter of the bleb with a pen
  27. Record the procedure and site of injection on medication administration record

Mixing Insulin in One Syringe


Medical Equipments:
  • Medication administration record
  • Insulin vials
  • Alcohol swab
  • Insulin syringe

Nursing Procedures:

  1. Assess patient's allergies or medical condition that would contraindicate in administrating the drug
  2. Gather necessary equipment
  3. Check the medication administration record against medication order
  4. Wash your hands
  5. Follow the five rights of medication administration and check the patient's identification band
  6. Remove insulin vial cap
  7. Rotate each bottle of insulin slowly but never shake them. Make sure suspensions are thoroughly mixed
  8. Clean the rubber stopper of the vial with an alcohol swab
  9. Remove cap from the needle. Draw air into the syringes equal to the doses of insulin to be given. Insert needle into vial of the suspension, not to touch the needle to the medication in the vial. Inject the air into the vial and remove the needle. Do not withdrawal any insulin yet
  10. Fill syringes with air equal to dose of regular insulin. Insert needle into bottle and inject air into vial. Invert bottle and pull plunger down to withdraw the appropriate dose of insuline
  11. With needle in the bottle, hold it up to the light and look for air bubbles. Remove air bubble if any by taping or flicking the syringe with your finger to cause air to rise and then push plunger to push air and some insulin back into the vial. Pull back to get the appropriate dose of insulin free of air.
  12. Remove the needle
  13. Again insert needle into the vial of longer-acting insulin and make sure that the tip of the needle is below the surface of the fluid level. Invert the bottle and slowly draw back to dose of insulin prescribed.
  14. Remove the needle
  15. Have another nurse check the prescribed dose
  16. Store insulin vials according to your agency policy
  17. Wash your hand

Withdrawing Medication from a Vial

Medical Equipments:
  • Medication administration record (MAR)
  • Sterile syringes and needle
  • Alcohol swab
  • Medication vial
  • Sterile needle

Nursing Procedures:
  1. Wash your hands
  2. Prepare the vial
  3. Open the alcohol swab
  4. For new vial: remove metal cap from vial and cleanse the rubber top of vial
  5. For used vial: cleanse the rubber top of the vial
  6. Choose a syringe of appropriate size
  7. Grasp needle and turn barrel of syringe to the right
  8. Remove the needle cap and pull back on plunger to fill syringes with an amount of air as much as the amount of solution to be withdrawn from the vial
  9. Insert the needle into the center of the upright vial and inject air into the vial
  10. Invert the vial and keep it at the eye level and the needle's bevel below the fluid level, and remove the exact amount of medication while touching only the syringe barrel and plunger tip SEE PICTURE
  11. Remove air from the syringe while needle remains within the inverted vial by tapping the syringe side by your finger
  12. Check the amount of medication in the syringe
  13. Turn vial upright and remove the needle
  14. Replace the needle cap and replace with new needle. Remove used needle and dispose it in the sharps container
  15. Attaché the new needle to the syringe by turning the barrel to the right
  16. Compare the medication in the syringes with the prescribed dosage

Withdrawing Medication from an Ampule

Medical Equipments:
  • Medical administration record (MAR)
  • Sterile syringe and needle
  • Extra needle of proper gauge and length according to the site of injection
  • Ampule of prescribed medication
  • Sterile gauze or alcohol swab
  • Filter needle

Nursing Procedures:
  1. Wash your hands
  2. Hold the ampule and tap the top chamber quickly and lightly until all fluid flows into the bottom chamber
  3. Place a sterile gauze or alcohol swab around the neck of the ampule
  4. Firmly grasp the neck of the ampule and quickly snap the top off away from your body, and put the ampule on a flat surface
  5. Withdraw the medication from the ampule while maintaining the sterile technique
  6. Check the connection of needle to syringe turning barrel to right while the needle guard is held
  7. Use a filter needle if recommended
  8. Remove needle guard and hold syringes in domain hand
  9. With non dominant hand, grasp ampule and turn upside down, or stabilize ampoule on a flat surface
  10. Insert the needle into the center of the ampule and do not allow the needle tip or shaft to touch the rim of the ampule SEE PICTURE
  11. Keep needle tip below level of meniscus
  12. Aspirate the medication by pulling on the plunger
  13. If air bubbles are aspirated, remove the needle from the ampule, hold syringes with needle pointing up and tap sides of the syringes. Draw back slightly on plunger, and gently push the plunger upward to eject air. Reinsert the needle in the middle of the ampule and continue withdraw the medication
  14. Remove excess air from the syringe and check the dosage of medication in the syringes. Recap
  15. Discard any unused portion of the medication, and dispose of the ampule top in a suitable container after comparing with medical administration record
  16. Change needle discard used needle properly. Secure needle to syringes by turning the barrel to right while holding the needle guard
  17. Wash hands

Administering Oral Medication

Medical Equipments:
  • Medication administration record (MAR)
  • Medication cart or tray
  • Glass of water of juice
  • Medication cup
  • Medication properly labeled
  • Straw

Nursing Procedures:
  1. Identify the patient's potential problem such ach absence of a gag reflex
  2. Check the MAR against the written orders
  3. Identify for drug allergies
  4. Wash your hand
  5. Prepare the medication for one patient at a time
  6. Select the correct medication and double-check against MAR
  7. Calculate the medication doses if necessary and double-check for accuracy
  8. Do not touch the drug while pouring in cup or leave the drug in the wrapper if unit-dose is available until at the bedside
  9. For liquid medication: place the label side of the medicine bottle against your palm and pour the liquid at eye level

  10. Recheck the medication with MAR
  11. Check again MAR and make sure that all medications to be administered have been prepared
  12. Place on the tray or medication cart
  13. Check patient's armband before giving medication
  14. Do any assessment required before the drug administration such ach apical pulse rate before digoxin administration
  15. Place patient on sitting position
  16. Provide liquids before and during ingestion and encourage patient to drink 5-6 oz of water
  17. If the patient is unable to hold the medication cup, assist him/her by using medication cup to introduce the pills to the person's mouth one at time
  18. If a drug / medication falls on the floor, discard it and start over
  19. Remain with the patient until all medications have been swallowed
  20. Wash your hand
  21. Record the administered drug on the Medical Administration Record
  22. Observe the side effects or adverse reaction that might be happened to the patient

11.3.09

Urine Collection: Clean Catch, Female

Equipments:
  • Examinations glove
  • Sterile collection container, lid, and label
  • Sterile midstream kit
  • Three antiseptic towelettes or 3 cotton balls saturate with an antiseptic solution

Nursing Procedures:
  1. Check patient's identification band
  2. Gather the equipments
  3. Wash your hand and don glove
  4. Provide privacy for patient
  5. Instruct female patient to sit with legs separated on the toilet, open the sterile container and place the lid up on a firm surface in easy reach
  6. Instruct female patient to use thumb and forefinger to separate labia
  7. With the labia separated, instruct female patient to cleanse one side of the labia with the towelette, discard the towelette, repeat procedure on the other side with the second towelette. Make sure the labia stay separated throughout the procedures
  8. Instruct her to urinate into the toilet, place the collection cup unter the stream of urine after a good flow of urine has been started. Fill the container just half-way with urine
  9. Position sterile lid back onto the container, close tightly, label it, and send it to laboratory

Urine Collection: Closed Drainage System


Equipments:
  • Rubber band or catheter clamp
  • Tape and sign
  • Examination gloves
  • Sterile specimen container and label
  • Sterile packages of 70% isopropanol or povidone-iodine
  • Sterile 10 cc syringes with 23- or 25-gauge needle

Nursing Procedures:
  1. Check patient's identification band
  2. Gather equipments
  3. Inform and explain procedure to patient
  4. Manipulate the drainage tubing so that the urine in the tubing goes into the bag
  5. Clamp the drainage tubing below the aspiration port, leave clamped 10-15 minutes
  6. Tape a sign over the client's bed that the foley catheter's drainage tubing is temporarily clamped for a specimen
  7. Wash your hand and don gloves
  8. Provide privacy for patient
  9. Cleanse the aspiration port at a 45 degrees angle, aspirate 10 ml from port and remove needle
  10. Place urine into sterile labeled container, secure lid on container, then place container in a biohazard bag
  11. Store needle and syringe unit into sharp box container and never recap a contaminated needle
  12. Remove the notice from above the bed
  13. Send specimen to laboratory
  14. Remove and dispose the gloves and wash your hands

Venipuncture

Equipment:
  • Sterile packages of 70% isopropanol (antiseptic) and povidone-iodine (topical anti-infectant)
  • Sterile needle and syringe or vacutainer system (20- or 21-gauge needle for cubital vein puncture on an adult)
  • Sterile 2 x 2 cotton gauze and povidone-iodine
  • Tourniquet
  • Nonsterile gloves
  • Bandage or sterile adhesive bandage
  • Collecting tube

Nursing Procedures:
  1. Check patient identification band
  2. Wash hands
  3. Inform and explain the procedure to patient
  4. Position patient in a sitting or supine position and lower side rail
  5. Prepare supplies: open sterile packages and label specimen tubes with the patient's data
  6. Place arm straight or in dependent position if possible
  7. Tourniquet is applied 6-10 cm above the elbow and should only obstruct venous blood flow, not arterial flow
  8. Select a dilated vein. SEE PICTURE.
  9. If a vein is not visible, encourage patient to pen and close his / her fist, or stroke extremity from proximal to distal, tap lightly over a vein, apply warmth
  10. Palpate vein for size and pliancy and make sure it is well seated
  11. Release the tourniquet


  12. Cleanse puncture site with isopropanol, let it dries and cleanse it with povidone-iodine, let dry or wipe with sterile gauze. Do not touch site after cleansing.
  13. Store equipment in easy reach and position yourself to access the puncture site
  14. Apply the tourniquet again (should not exceed 3 minutes)
  15. Don glove
  16. Perform venipuncture
  17. Remove cap from 20- or 21-gauge needle.
  18. With nondominant hand, stabilize the vein by holding the skin taut over the puncture site (apply downward tension on the forearm with your thumb).
  19. With dominant hand, hold the needle bevel facing upward at an approximate 30° angle to the arm
  20. Puncture the skin into the straightest part of vein with a steady, moderately fast movement. (When the vein is entered you will feel a slight give and can see blood at the needle’s hub.)
  21. Apply moderate negative pressure by puncturing the vacuum tube or by gently retracting the syringe plunger. (When first performing a venipuncture, use a syringe. It takes greater dexterity to puncture the vacuum tube with a two-sided needle; if you apply too much pressure you will go through the vein.)
  22. The tourniquet is removed when blood is flowing into the tube or syringes then collect specimens
  23. Remove the needle and apply pressure to site immediately for 2-3 minutes or 5-10 minutes if patient is in under anticoagulant treatment. Keep the arm straight
  24. Let patient maintain pressure on the puncture site
  25. Apply a sterile bandage or adhesive bandage to the puncture site
  26. If using a needle and syringes, transfer the blood into test tube under moderate pressure
  27. Dispose the needle or syringes into a sharp box container
  28. Remove glove and wash your hands

Assessment: Blood Pressure


Medical Equipments:
  • Alcohol swabs
  • Stethoscope
  • Sphygmomanometer

Nursing Procedures:
  1. Identify the extremity that is most appropriate for reading. Furthermore do not take blood pressure reading on an injured or painful extremity or on in which an intravenous line is running
  2. Select a cuff size to completely encircle upper without overlapping
  3. Move clothing away from upper arm
  4. Position arm at heart level, extend elbow with palm turned upward
  5. Make sure bladder cuff is fully deflated and pump valve move freely
  6. Identify brachial artery in the antecubital space
  7. Apply cuff snugly and smoothly over upper arm about 2.5 cm (1 inch) above antecubital space with center of cuff over brachial artery
  8. Connect bladder rubbing to manometer tubing or if a portable mercury-filled manometer is used, position vertically at eye level
  9. Palpate brachial artery, then turn valve clockwise to close and compress bulb to inflate cuff to 30 mg Hg above point where palpated pulse disappears.
  10. Slowly deflate cuff and noting reading when pulse is felt again.
  11. Insert earpiece of stethoscope in ears with a forward tilt and ensure that the diaphragm hangs freely
  12. Relocate brachial pulse with your non-dominant hand and place bell or diaphragm chestpiece directly over pulse. The chestpiece of stethoscope should be in direct contact with skin and not touch cuff. see picture
  13. Close the valve with dominant hand by turning it clockwise then compress pump to inflate cuff until manometer reach 30 mm Hg above diminished pulse point
  14. Turn valve counterclockwise slowly so the mercury falls at 2-3 mm Hg per second. Listen for five phase of Korotkoff's sounds while noting manometer reading. A fain, clear tapping sound appear and increase in intensity (phase I), sound swishes (phase II), sound intense (phase III), abrupt and distinctive muffled sounds (phase IV), and sound disappears (phase V)
  15. Deflate cuff rapidly and completely
  16. Remove cuff or wait 2 minutes before taking a second reading
  17. Record and inform patient about result
  18. Put all equipment and store in proper place
  19. Wash hands
  20. Document the result in patient's medical record and compare with patient's baseline data and normal range for age group
  21. If there are abnormal result, measure again and report abnormal result to instructor or nurse in charge

Assessment: Respiration

Equipments:
Watch with a second hand


Nursing Procedures:

  1. Assess patient's respiration before replacing gown from auscultating heart sounds
  2. Place your hand over patient's wrist and observe one complete respiratory cycle
  3. Start count with first inspiration while looking at second hand weep of watch. For infants and children, count it a full minute. For adult, count it for 30 second then multiply by 2 if regular rate or count it for a full minute if irregular
  4. Assess the depth of respiration by degree of chess wall movement and rhythm of cycle
  5. Replace client's gown
  6. Record rate and character of respirations

8.3.09

Assessment: Respiration

Equipments:
  • Watch with a second hand

Nursing Procedures:
  1. Assess patient's respiration before replacing gown from auscultating heart sounds
  2. Place your hand over patient's wrist and observe one complete respiratory cycle
  3. Start count with first inspiration while looking at second hand weep of watch. For infants and children, count it a full minute. For adult, count it for 30 second then multiply by 2 if regular rate or count it for a full minute if irregular
  4. Assess the depth of respiration by degree of chess wall movement and rhythm of cycle
  5. Replace client's gown
  6. Record rate and character of respirations

Assessment: Pulse Rate – Apical Pulse

Equipments:
  • Watch with a second hand
  • Alcohol swab
  • Stethoscope
Nursing Procedures:
  1. Raise patient's gown to expose sternum and left side of chest
  2. Cleanse earpiece and diaphragm of stethoscope with an alcohol swab
  3. Put stethoscope around your neck
  4. Position patient on left side and locate suprasternal notch
  5. Palpate second intercostals space to left of sternum
  6. Place index finger in intercostals space and counting downward until fifth intercostals space is located
  7. Move index finger along fourth intercostals space left of the sternal border and to the fifth intercostals space, left of the midclavicular line to palpate the point of maximal impulse, see picture
  8. Keep index finger of nondominant hand on the PMI
  9. Inform the patient that you are going to listen to his/her heart and instruct him/her to remain silent
  10. Put earpiece of the stethoscope in your ears with dominant handa and grasp diaphragm of the stethoscope in palm of your hand for 5-10 second
  11. Place diaphragm of stethoscope over the PMI and auscultate for S1 and S2 to hear lub-dub sound, see picture
  12. Identify the regularity of rhythm
  13. Count lub-dub sound as one beat while looking at second hand of watch. For a regular rhythm count rate for 60 seconds, while for an irregular count it for a full minute and noting number of irregular beats
  14. Record by site the rate, rhythm and number of irregular beats

Assessment: Pulse Rate – Radial Pulse


Equipments:
  1. Watch with a second hand
  2. Alcohol swab
  3. Stethoscope

Nursing Procedures:
  1. Inform patient the site at which the pulse will be measured
  2. Flex patient's elbow and place lower part of arm across the chest
  3. Support patient's wrist by grasping outer aspect with thumb
  4. Place your index and middle finger on inner aspect of patient's wrist over the radial artery and apply light but firm pressure until pulse is palpated
  5. Identify the rhythm of pulse
  6. Identify pulse volume
  7. Count pulse rate by using second hand on a watch. For regular rhythm, count number of beats for 30 seconds and multiply by 2, while for an irregular rhythm, count it for a full minute and noting number of irregular beats

Assessment: Body Temperature – Tympanic Temperature

Follow this step when using tympanic temperature (infrared thermometer) in measuring body temperature:
  1. Place patient in "sims" position
  2. Remove the probe from container and attach it cover to tympanic thermometer unit
  3. Turn patient's head to one side. For an adult: pull pinna upward and back. For a child: pull down and back.
  4. Insert probe gently with firm pressure into ear canal
  5. Remove prove after reading is displayed on digital unit. It usually needs 2 seconds
  6. Return tympanic thermometer to storage unit
  7. Record the result and indicate site as "ET"

Assessment: Body Temperature – Disposable (chemical strips) Thermometer

When measuring body temperature by using the disposable (chemical strips) thermometer, follow this procedure here:
  1. Apply tape to appropriate skin area (usually on forehead)
  2. Observe the color changes on tape
  3. Record the result and indicate method

Assessment: Body Temperature – Axillary Temperature

Nursing Procedures:
  1. Remove patient's arm and shoulder from one sleeve of gown but avoid expose chest
  2. Make sure that the axillary skin is dry or pat if necessary
  3. Remove thermometer from storage container and cleanse under cool water
  4. Wipe thermometer dry with a tissue from bulb's end toward fingertips
  5. Place thermometer or probe into center of axilla, fold patient's upper arm straight down and place the arm across patient's chest, see the picture
  6. Leave the glass thermometer in place as specified by agency policy that usually 6-8 minutes, or leave the electronic thermometer in place until signal (beep) is heard
  7. Remove the thermometer and read the result the inform it to patient
  8. Remove thermometer and wipe it with a tissue away from fingers toward the bulb's end
  9. Shake the thermometer down and cleanse it with soapy water, rinse under cold water and return it to the storage container
  10. Assist patient with replacing gown
  11. Record the result and indicate site as "AT"

Assessment: Body Temperature – Rectal Temperature

Nursing Procedures:
  1. Place patient in the "sims" position with upper knee is flexed.
  2. Adjust sheet to expose only anal area
  3. Place tissues near patient and easy to reach
  4. Don gloves
  5. Remove rectal thermometer from storage container and cleanse under cool water
  6. Wipe rectal thermometer dry with a tissue from bulb's end toward fingertips
  7. Lubricate tip of rectal thermometer or probe
  8. Grasp the thermometer with dominant hand and separate buttocks to expose anus with non-dominant hand
  9. Instruct patient to take a deep breath then insert thermometer or probe gently into anus (infant 0.5 inch, adult 3.5 inch) and if there is a resistance, do not force insertion
  10. Leave the thermometer in place as specified by agency policy that usually 3-5 minutes
  11. Wipe secretion off glass thermometer with tissue and dispose the tissue in a receptacle
  12. Read the result and inform it to patient
  13. Hold glass thermometer in one hand, wipe anal area with tissue to remove lubricant or feces with other hand and dispose of soiled tissue, then cover patient
  14. Cleanse thermometer by shaking the thermometer down and cleanse glass thermometer with soapy water, rinse under cold water, and return it to storage container
  15. Remove and dispose of glove in receptacle, then wash hand
  16. Record the result and indicate site as "RT"

7.3.09

Body Temperature – Electronic Oral Temperature

Nursing Procedure:
  1. Place disposable protective sheath over probe.
  2. Grasp top of the probe’s stem. Avoid placing pressure on the ejection button.
  3. Place tip of thermometer under the client’s tongue and along the gum line to the posterior sublingual pocket lateral to center of lower jaw
  4. Instruct client to keep the mouth closed around thermometer.
  5. Thermometer will signal (beep) when a constant temperature registers.
  6. Read measurement on digital display of electronic thermometer. Push ejection button to discard disposable sheath into receptacle and return probe to storage well.
  7. Inform client of temperature reading.
  8. Remove gloves and wash hands.
  9. Record reading and indicate site “OT.”
  10. Return electronic thermometer unit to charging base.

Body Temperature – Glass Oral Temperature

Nursing Procedure:
  1. Select correct color tip of thermometer from patient’s bedside container
  2. Remove thermometer from storage container and cleanse under cool water
  3. Wipe thermometer dry with a tissue from bulb’s end toward fingertips.
  4. Read thermometer by locating mercury level. It should read 35.5°C (96°F).
  5. If thermometer is not below a normal body temperature reading, grasp thermometer with
  6. thumb and forefinger and shake vigorously by snapping the wrist in a downward motion to move mercury to a level below normal.
  7. Place thermometer in mouth under the tongue and along the gumline to the posterior sublingual pocket. Instruct client to hold lips closed.
  8. Leave in place as specified by agency policy, usually 3–5 minutes.
  9. Remove thermometer and wipe with a tissue away from fingers toward the bulb’s end.
  10. Read at eye level and rotate slowly until mercury level is visualized.
  11. Shake thermometer down, and cleanse glass thermometer with soapy water, rinse under cold water, and return to storage container.
  12. Remove and dispose of gloves in receptacle,
  13. Wash hands.
  14. Record reading and indicate site as “OT.”

Body Temperature Measuring – General

Nursing Equipments:
  1. Thermometer: glass; electronic and disposable protective sheath; disposable (chemical); tympanic.
  2. Lubricant (rectal, glass thermometer)
  3. Two pairs of nonsterile gloves
  4. Tissues


Nursing Action:
  1. Review medical record for baseline data and factors that influence vital signs
  2. Explain to the patient that vital signs will be assessed and encourage them to remain still and refrain from drinking, eating, or smoking
  3. Assess patient’s toileting needs and proceed as appropriate
  4. Obtain equipment as indicated
  5. Provide privacy
  6. Wash hands and don gloves
  7. Keep the patient in a sitting or lying position with the head of the bed is elevated 45 – 60 degrees to measure all vital signs except those designated otherwise
  8. Follow next nursing action for body temperature measurement with oral temperature (glass and electronic thermometer), rectal temperature, axillary temperature, disposable (chemical strip) thermometer, and tympanic temperature (infrared thermometer)